Showing posts with label volunteering. Show all posts

Wednesday, August 17, 2022

sensah installation

 Only a day or two after I'd ordered the Sensah Empire groupset, it arrived, which tell me that Sensah is making a point of having stock here in the US for quick delivery.

Instructions in Chinese (I think)...

... and English.


The goods. I popped for the 6-piece set, because I haven't had an 11-speed setup, and needed the cassette and chain, in addition to the controls and derailleurs.

You don't need to stick around for the whole post; I'm going into detail below for the bike nerds and my fellow volunteers at the New Brunswick Bike Exchange, one of whom asked for a how-to post (it will follow, Anna). Let's get the installation review out of the way right away:

The bad: The controls were difficult to install, because the clips that go around the bar were too small. I suspect that my 70's-era handlebar may be a little larger than the current specification, but I had to remove the clips from the controls, and drill out the mounting holes so they were wider, so I could get the clips around my bars and into position. I have not heard of anyone else having this problem, but it will be part of my product review when I post it (but I'll wait until I have more miles on the groupset to do that). Edit Sep 1 2020: I unwrapped the bar and got a diameter measurement. Standard drop bars are either 22.2 or 23.8mm diameter at the sections that don't go in the stem. My 80's-era Cinelli Campione del Mondo bars are almost 25mm diameter. For those of you who are using handlebars that are less than 40 years old, you should have no problem. For the rest of you, you can get these guys, chuck the nuts and bolts, replace the clampy bits that come with the Sensah set with the clampy bits you just got, and tighten 'em up. Even with the new parts, cost will only be just north of $200.

The good: First, I like the appearance and finish. I went for the all-aluminum set; there's a faux-carbon-fiber decal on the rear derailleur I could do without, but I like the techie look of the derailleur generally, and I like the brake/shifter controls. I had heard complaints about the quality of the hoods, but Sensah appears to have addressed that.

Second, this was the easiest install I've ever done. Once I'd set the high and low limit screws for the derailleurs, it went together like Legos, and the shifting worked the first time without the need for fussy adjustment (I ALWAYS have to adjust once I install the cables... but not this time). I had to pay attention to the B-screw, but that's expected: every bike is going to have a different clearance for the rear derailleur, and it was easy to set. I expect it will need adjustment in the morning after the housing beds in, but that's also usually unavoidable.

Third, the shifting is quick and crisp. I've rolled around the neighborhood, moving through the gears, and even cross-chained, I've had no problem with the shifts. I'm going to need to learn how to use these controls (they use the SRAM system of a short push to upshift, and a long push to downshift), and I miss the ability to "dump the cassette" (to shift across many gears in the back, like when a sudden, sharp uphill appears), but I'll have to get used to that.

So early indications are that this set is a good mechanical replacement for Shimano 105, if that goes all-electronic. (The set is also available with a 34 large cog, which is a boon to hill climbers.)

I had planned to put it on the monstercross bike, but the brake levers aren't compatible with the v-brakes... so I swallowed hard, and mounted it up on the titanium Yellow Maserati.

OK; bike-nerdy stuff:


The chain whip, that holds the cassette when you need to loosen (blue handle pointing to 1:00) and the beam torque wrench for installing and removing the cassette (pointing to about 7:30).


Bars, ready for installation. In the center are cross-top brake levers, so I can engage the brakes from the top of the bars, as well as from the controls (when installed).

The clip, with the hole that needed widening. I used a power drill and ran the side of the drill bit up and down the side of the hole.


Sighting across the brake hoods to get 'em even. (I'm not great at this; I often need a second opinion.)


Sorry for the out-of-focus, but you can see the grey mushroom head of the brake cable installed on the lever, with the cable disappearing into the hood to the left.


For this setup, the cables and housing go under the bar tape: brake cable in front, derailleur cable in back. Tape the housings to the bars before wrapping them.


Titanium is known for "galling", fusing to other metals if they are in close contact under pressure (like when you tighten a bolt). In other applications, we might grease a bolt before installation to forestall sticking; for titanium (like my bike frame), we use a special preparation. You don't need a lot, but you'll be happier if it's there. This is the rear derailleur being mounted.

On initial installation, the derailleur needs adjustment; the wheel on the derailleur needs to point to the outermost gear; in this case it's pointing to the second gear (that thing pointing to the outermost gear is part of the cage). Loosen the high-gear limit screw until they line up.


Adjust the B-screw until the chain just barely goes between the cog on the cassette and the jockey wheel on the rear derailleur, but does not get hung up in the system.

Feel free to contact me with questions or comments.


Sunday, May 15, 2022

edison bike tour


No club ride today, instead, volunteers from the New Brunswick Bike Exchange (and some others) provided support for the Edison Bike Tour. That's the rogue's gallery, above.

Rumor had it that the route was gonna be 21 miles, but RideWithGPS reports 26 (I had a couple of extra miles before the start, because of course I did). I'd hoped to ride ahead and back to add miles, but that wasn't the way this one worked; the police closed the roads as we all went by, and we had to stay with the peloton (there were kids and other slow riders, so we couldn't all go at our own speeds). 

At one point, a rider had a flat, and I was halfway through getting him going when I was stopped and told to have him and his bike carried by the sag wagon, to be addressed at the stop, because we couldn't allow any more time with the road closed. 

Even with just 26 miles, I was beat, with the constant starting-and-stopping, the slow speed, and the looking out for riders who needed attention. And I'd dressed for the predicted mid-60's-and-rain, not the 82-and-sunny that we actually got!

 I had a couple of nice chats with the support cops (which were among my most successful interactions with the constabulary: all those police, and not one said, "OK, license and registration. Do you know why I stopped you?").

It was fun. I'd do it again...

...but on the way home, the seatbag fell off the bike and got run over in traffic.After the loss of the favorite tire tool (and also the discovery that a pump wasn't working) yesterday, I'm in a foul mood over the need to replace so many bike-y things on which I depend. (I did salvage a good CO2 inflator and some metal tire levers... but a collection of chain quick links, among other things, is gone, gone, gone.) I am exceptionally grumpy about it.

Enough. How about some more pictures?


Thursday, March 17, 2022

on brakes


One of my students sent me this image to remind me to do a more in-depth explanation of rim brakes... so here we go:

On road bikes, with narrow wheel rims, road bike caliper brakes are most common, even with the advent of disk brakes. Despite bike industry hype, caliper rim brakes are effective for road bikes. They are also lighter, and simpler to maintain (and you don't need to be a pro mechanic to do it... which may be part of the reason so many pro mechanics push disk brakes). Disk brakes are also prone to heat problems, for example when "riding" the brakes on long descents; I have heard few complaints aboout heat problems for rim brakes among road bikers. (Edit 3/18/22: I have just gotten word of one more of these complaints.)

The older form of these rim brakes have a single pivot with two elements:

(Yummy detailing on that lug, right?) These brakes are a little more difficult to adjust than the newer dual-pivot, three-element brakes:


The extra element means these can be centered more easily than the single-pivot relatives.

For wider rims, cantilever brakes were developed. 

The stopping power on these, however, is not ideal; as you pull harder on the lever, more energy goes into lifting the cable, and less into pulling the brake pad into the rim, because of changes in the "up vector" and "in vector". They were largely replaced by "U brakes":


These reduced, but did not eliminate, the problem of the direction of pull being at right angles to the direction you want the pads to go. That problem is almost eliminated by "V brakes".


The picture shows the noodle (of course it's too small; click on the picture to see a bigger version). The noodle changes the direction of cable pull from straight up to the lever, to straight across the calipers, so that almost all of your effort (except for that lost to friction) goes into pushing the brake pad against the rim.

Now, for off-road bikes, especially mountain bikes, rims can get wet and muddy, reducing the effectiveness of rim brakes; for these, the newfangled disk brakes make sense, since the disk is higher up on the wheel, and so is farther away from the mud and muck than the braking surface of the rim.

But I'm a retrogrouch who still uses friction shifting. What do I know?


Wednesday, February 23, 2022

cable housing protector, and thoughts on loving bikes


 I'm volunteering at the New Brunswick Bike Exchange, and my current project (other than the maintenance class I'm teaching) is a vintage steel-frame Atala, with Shimano components (not Campagnolo, as suggested by the Italian name on the frame). For a bike of its age, it's remarkable: the 2x6 indexed downtube shifters are perfectly in alignment, the brakes work and fit, neither the seatpost nor the 1" steerer tube are frozen into place. The bike is remarkably light. 

I removed the old bar wrap, and found underneath this flexible, articulated protector for the brake housing. This was probably one of the first bikes on which housing was routed under the bar wrap along the handlebar, for better aerodynamics. Engineers might have thought hand pressure would affect braking performance, and arranged to have the reinforcer above. I'd never seen such a thing.

It's the second of two lovely old bikes I've had the opportunity to work on (the first has a "Performance" brand name and is labeled as the official bike of the US team). I got infatuated with that first one, and have a label on it that it is not to be sold until I have a chance to ride it. I'll get my ya-ya's out for a couple miles, and then be done with it.

There's a movement among friends and volunteers at the bike exchange to have me buy this Atala for myself, but The Excellent Wife (TEW) and I just don't have the room for another bike, with my two and TEW's road bike and hybrid. Laura OLPH has suggested that the Atala might take the place of the Krakow Monster, the Surly Cross Check frame I've built up to be a Monstercross bike. It's true I don't ride the Monster much, and I don't love it the way I do the titanium Yellow Maserati, but I don't think it would be a good plan to have two road bikes, and nothing I could ride on trails.

That Atala is a nifty bike, though. I hope it will go to someone who will love it.

Friday, February 18, 2022

NBBEX bike maintenance class - changing tires

Some notes after last night's maintenance class at the NBBEX:

 A better explanation of the actual tire change:


(Most of the videos on this channel are nothing-in-particular, but they have a few from this mechanic. I like his style; I think he's who I wanna be when I grow up.)

Remember the process:

  • Remove the wheel from the bike. If it's a front wheel, there's likely to be some arrangement on the fork that will stop the wheel from just falling off the bike when you open the quick-release or remove the wheel nuts (remind me to talk about quick-release placement in one of these sessions). If it's a rear wheel, get the chain as loose as you can (on geared bikes, shift to the smallest gears front and back, and then probably drop the chain to the inside of the smaller front gear [the front gears are called "chainrings"]).
  • Remove one side of the tire from the rim. Do it by hand if you can; if you need to use tools (tire levers, or what-have-you), go carefully.
  • Remove the tube.
  • Pump up the tube to see if you can find the hole. Examine the inside and outside of the tire to see if you can find what caused the puncture, if it was a puncture. (Sometimes, tubes just give up the ghost because of weaknesses in manufacturing. Sometimes, the problem is a leaky valve.)
  • Put a little bit of air in the new or repaired tube to give it shape, and replace the tube into the wheel between the rim walls. The air is to help the tube stay put.
  • Replace the bead of the tire into the rim. It will go easy until the last little bit. When it gets harder, see if the tire bead is stuck in the hooks (that depression in the rim wall where the bead goes). If the tire is stuck there, push the bead out of the hooks and toward the center of the wheel, so it can drop into the "well", which will give you a little more slack. If you do need to use levers or other tools to get it back on, be careful; you can pinch the tube and puncture it... and then you gotta start the whole process over again. Guess how I learned that?
  • You might want to replace the wheel before you pump up the tire, to make sure it passes the brake.
  • Replace the wheel in the dropouts. In front, you'll need to deal with whatever it was that was keeping the wheel on in case the nuts or dropouts loosened. In the back, you'll want to pull the pulley wheel behind the gears as you put the wheel in (remember that you shifted to the smallest gear. The bike will fight you if you're trying to put the wheel back, with the chain wrapped on the wrong gear). Tighten the nuts or dropouts.

For rear wheels on bikes without derailleurs, the process is a little different. The rear dropout will be horizontal, and will have room to slide the wheel forward and back when you loosen the nuts. Slide the wheel forward to get the chain loose enough to get off the gear in the back (you may also have to take it off the chainring in the front). You'll then be able to slide the wheel back and out. After the tire change procedure, hook the chain over the right side of the wheel, slide the chain all the way forward in the dropout, replace the chain on the chainring and gear on the hub, and pull the wheel back. The wheel will want to go in crooked, with the right side forward, and the left side of the tire binding on the left chainstay. I find it works better for me to use my left hand to push the tire backwards in the dropout, and use the other to tighten the right nut in the correct place. Then, use my right hand to hold the wheel straight in the bike, and use the left to tighten the other nut. We should talk about this, too.

A discussion came up about what pumps to carry on the bike. I carry one on each.


That's my road bike, which I call the Yellow Maserati (because it is neither yellow nor a Maserati). The pump on it is the Lezyne HV Drive frame pump. Lezyne makes various pumps, tools, and the like. While all Lezyne's offerings are reliable and effective, many are jewelry, with expensive flash and gewgaws (like a rosewood handle on a chain tool, that's likely to get covered in grease). This was a gift.


On the gravel bike (called the Krakow Monster, you can find out why at this link... the Excellent Wife (TEW) was in Krakow at the time I was building it up), I carry the Acacia pump, with the pressure gauge. I had been taken with another Lezyne pump, which is gorgeous, but the $85 price tag was off-putting. The $28 cost of the Acacia suited me better, and it's almost as good-looking.

I'm a sucker for pretty bike things. (But I'm always afraid to use or carry them, out of fear that I'll screw 'em up. I need a lotta help...)

Finally, I was asked about what I carry on a ride. I carry far too much stuff; of the twenty pounds of bike-and-gear on the road bike, almost three pounds of it is the bag and the stuff in it. You will not need to carry all this; I go mostly on rides with my club, and I make it a point of pride that I have the stuff you need to get you home after most breakdowns. 

That said:


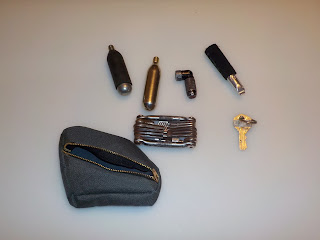
You can click on the picture to enlarge. At top right is the seatbag I switch between the bikes. It's the Topeak Aero-wedge in the largest size they offer; I use the clip variety to facilitate switching it between bikes.

The other stuff, from upper left:

  • Two cut pieces of tire to use as tire boots. If you get a gash in the tire that's too big to just ride on, sometimes you can put something into the tire behind the gash to keep the tube from poking out and bursting.
  • Below that, in the pill bottle: various quick replacement links for 9- and 10-speed chains. I know from experience that I can use a 10-speed link to temporarily fix an 11-speed chain.
  • Next, two Park Tool tire boots, plastic, with adhesive on the inside. These were a gift. They probably work better than the pieces of tire, but I haven't needed to try 'em yet.
  • Next, a complete set of Allen wrenches (also called hex wrenches or Allen keys). While there are Allen wrenches on my multi-tool (see below), I found they were too short to reach some of the stuff I wanted to reach, and I have room for these in that voluminous seatbag.
  • Second row, left: a tire tool by VAR, a French company (the two blue things). This can be used as tire levers, and also (theoretically) to get a tight tire on a wheel. They may no longer be available, and may be more effective in theory than practice.
  • Two tubes. These are narrow enough for the tires I use on the road bike, but will expand to fit the wider tires on the gravel bike. 
  • An organizer bag I sewed up to fit inside the seat bag; I made the pattern to fit the curve of the seatbag (did I tell you I was teaching myself to sew?).

Inside the organizer bag:


  • From top left: two CO2 cartridges. One has a removable rubber insulator, because the inflation process causes the cartridge to chill so quickly that frost will form on it and it can cause frostbite.
  • The CO2 "detonator", that punctures the cartridge and gets the gas into the tire. This one works. There are fancier ones; some work, some don't.
  • In a black rubber carrier, two Lezyne aluminum tire levers. I've broken plastic ones. These don't break. (They also don't have the hooks that hold them in place on the spokes, like the ones Anna used last night, so they're not ideal. But they're pretty!)
  • Below that, the Crank Brothers M19 Multi-Tool. It's got a chain tool and spoke wrenches in addition to the Allen keys, screwdrivers, and such that other multi-tools have. I have used the chain tool and the spoke wrenches to get riders going again. (You definitely want me along on your group rides!)
  • House keys. Of the many ways I'm a bit of a nutball, one of them has to do with keys: in addition to these, I keep extra keys in my wallet and in my car, and when I was working, I had them in my briefcase and in my desk at work. I have trauma about locking myself out of the house when I was in grade school. (As I so frequently say, it's not like I'm a &%$#ing wellspring of mental health...)

IN my pockets, I ride with a wallet with cash, credit card, and medical insurance stuff. You don't need your whole wallet, but I think you need at least that. I also carry my cell phone. Both of these are in weather-resistant bags.

Next week: Brakes! Are you sure you wanna go if you can't stop?

Thursday, February 10, 2022

NBBEX Bike Maintenance Class Notes Feb 10 2022

 For the folks in my bike maintenance class at the New Brunswick Bike Exchange: WE spoke about "doing the M" today. See the bike diagram below:

Click it to see full-size.

Another one, maybe more helpful (but not as cool):


We spoke about headset wrenches; see this page. (Park Tool is my favorite bike tool source.) We also spoke about hub wrenches (Park calls 'em "cone wrenches"; do youse remember I spoke about the cup-and-cone enclosing the bearing?)

Some tech talk about why WD-40 is not a good lubricant, especially for weather-exposed applications like bicycles. 

Ricky told me he might send along some pictures; if he does, I'll post them. Edit Feb 11: See below:


(How can I have such a huge bald spot, and also need a haircut so bad?)

For next week, I plan to talk about changing tires.