Some notes after last night's maintenance class at the NBBEX:
A better explanation of the actual tire change:
(Most of the videos on this channel are nothing-in-particular, but they have a few from this mechanic. I like his style; I think he's who I wanna be when I grow up.)
Remember the process:
- Remove the wheel from the bike. If it's a front wheel, there's likely to be some arrangement on the fork that will stop the wheel from just falling off the bike when you open the quick-release or remove the wheel nuts (remind me to talk about quick-release placement in one of these sessions). If it's a rear wheel, get the chain as loose as you can (on geared bikes, shift to the smallest gears front and back, and then probably drop the chain to the inside of the smaller front gear [the front gears are called "chainrings"]).
- Remove one side of the tire from the rim. Do it by hand if you can; if you need to use tools (tire levers, or what-have-you), go carefully.
- Remove the tube.
- Pump up the tube to see if you can find the hole. Examine the inside and outside of the tire to see if you can find what caused the puncture, if it was a puncture. (Sometimes, tubes just give up the ghost because of weaknesses in manufacturing. Sometimes, the problem is a leaky valve.)
- Put a little bit of air in the new or repaired tube to give it shape, and replace the tube into the wheel between the rim walls. The air is to help the tube stay put.
- Replace the bead of the tire into the rim. It will go easy until the last little bit. When it gets harder, see if the tire bead is stuck in the hooks (that depression in the rim wall where the bead goes). If the tire is stuck there, push the bead out of the hooks and toward the center of the wheel, so it can drop into the "well", which will give you a little more slack. If you do need to use levers or other tools to get it back on, be careful; you can pinch the tube and puncture it... and then you gotta start the whole process over again. Guess how I learned that?
- You might want to replace the wheel before you pump up the tire, to make sure it passes the brake.
- Replace the wheel in the dropouts. In front, you'll need to deal with whatever it was that was keeping the wheel on in case the nuts or dropouts loosened. In the back, you'll want to pull the pulley wheel behind the gears as you put the wheel in (remember that you shifted to the smallest gear. The bike will fight you if you're trying to put the wheel back, with the chain wrapped on the wrong gear). Tighten the nuts or dropouts.
For rear wheels on bikes without derailleurs, the process is a little different. The rear dropout will be horizontal, and will have room to slide the wheel forward and back when you loosen the nuts. Slide the wheel forward to get the chain loose enough to get off the gear in the back (you may also have to take it off the chainring in the front). You'll then be able to slide the wheel back and out. After the tire change procedure, hook the chain over the right side of the wheel, slide the chain all the way forward in the dropout, replace the chain on the chainring and gear on the hub, and pull the wheel back. The wheel will want to go in crooked, with the right side forward, and the left side of the tire binding on the left chainstay. I find it works better for me to use my left hand to push the tire backwards in the dropout, and use the other to tighten the right nut in the correct place. Then, use my right hand to hold the wheel straight in the bike, and use the left to tighten the other nut. We should talk about this, too.
A discussion came up about what pumps to carry on the bike. I carry one on each.


That's my road bike, which I call the Yellow Maserati (because it is neither yellow nor a Maserati). The pump on it is the Lezyne HV Drive frame pump. Lezyne makes various pumps, tools, and the like. While all Lezyne's offerings are reliable and effective, many are jewelry, with expensive flash and gewgaws (like a rosewood handle on a chain tool, that's likely to get covered in grease). This was a gift.


On the gravel bike (called the Krakow Monster, you can find out why at this link... the Excellent Wife (TEW) was in Krakow at the time I was building it up), I carry the Acacia pump, with the pressure gauge. I had been taken with another Lezyne pump, which is gorgeous, but the $85 price tag was off-putting. The $28 cost of the Acacia suited me better, and it's almost as good-looking.
I'm a sucker for pretty bike things. (But I'm always afraid to use or carry them, out of fear that I'll screw 'em up. I need a lotta help...)
Finally, I was asked about what I carry on a ride. I carry far too much stuff; of the twenty pounds of bike-and-gear on the road bike, almost three pounds of it is the bag and the stuff in it. You will not need to carry all this; I go mostly on rides with my club, and I make it a point of pride that I have the stuff you need to get you home after most breakdowns.
That said:

You can click on the picture to enlarge. At top right is the seatbag I switch between the bikes. It's the Topeak Aero-wedge in the largest size they offer; I use the clip variety to facilitate switching it between bikes.
The other stuff, from upper left:
- Two cut pieces of tire to use as tire boots. If you get a gash in the tire that's too big to just ride on, sometimes you can put something into the tire behind the gash to keep the tube from poking out and bursting.
- Below that, in the pill bottle: various quick replacement links for 9- and 10-speed chains. I know from experience that I can use a 10-speed link to temporarily fix an 11-speed chain.
- Next, two Park Tool tire boots, plastic, with adhesive on the inside. These were a gift. They probably work better than the pieces of tire, but I haven't needed to try 'em yet.
- Next, a complete set of Allen wrenches (also called hex wrenches or Allen keys). While there are Allen wrenches on my multi-tool (see below), I found they were too short to reach some of the stuff I wanted to reach, and I have room for these in that voluminous seatbag.
- Second row, left: a tire tool by VAR, a French company (the two blue things). This can be used as tire levers, and also (theoretically) to get a tight tire on a wheel. They may no longer be available, and may be more effective in theory than practice.
- Two tubes. These are narrow enough for the tires I use on the road bike, but will expand to fit the wider tires on the gravel bike.
- An organizer bag I sewed up to fit inside the seat bag; I made the pattern to fit the curve of the seatbag (did I tell you I was teaching myself to sew?).
Inside the organizer bag:
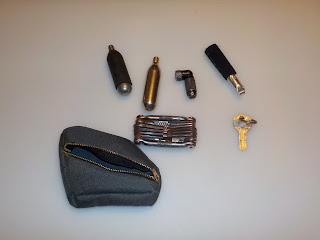
- From top left: two CO2 cartridges. One has a removable rubber insulator, because the inflation process causes the cartridge to chill so quickly that frost will form on it and it can cause frostbite.
- The CO2 "detonator", that punctures the cartridge and gets the gas into the tire. This one works. There are fancier ones; some work, some don't.
- In a black rubber carrier, two Lezyne aluminum tire levers. I've broken plastic ones. These don't break. (They also don't have the hooks that hold them in place on the spokes, like the ones Anna used last night, so they're not ideal. But they're pretty!)
- Below that, the Crank Brothers M19 Multi-Tool. It's got a chain tool and spoke wrenches in addition to the Allen keys, screwdrivers, and such that other multi-tools have. I have used the chain tool and the spoke wrenches to get riders going again. (You definitely want me along on your group rides!)
- House keys. Of the many ways I'm a bit of a nutball, one of them has to do with keys: in addition to these, I keep extra keys in my wallet and in my car, and when I was working, I had them in my briefcase and in my desk at work. I have trauma about locking myself out of the house when I was in grade school. (As I so frequently say, it's not like I'm a &%$#ing wellspring of mental health...)
IN my pockets, I ride with a wallet with cash, credit card, and medical insurance stuff. You don't need your whole wallet, but I think you need at least that. I also carry my cell phone. Both of these are in weather-resistant bags.
Next week: Brakes! Are you sure you wanna go if you can't stop?
Terrific. Thank you. I have a very similar (identical?) small pump. They do, I think, fail on the occasional valve stem with insufficient thread. I have a similar "convertible to foot pump" that I bring on multi-day unsupported tools where I seem to be pumping up the tires of half the group each morning. Otherwise, my biceps would get too big!
ReplyDelete